by Jim Dreher
Forward
This essay was reproduced from the archives of Durham Boat Companies essays and manuals on sculling and training. While this piece was originally produced 30+ years ago, the information contained below continues to provide the back-bone of proper sculling technique.
Overview
One way to quickly learn the complete rowing stroke is to break the stroke down into four parts to be practices as drills. The RELEASE or “Pick Drill” concentrates on the coordination of the arm and wrist movements at the finish of the drive, or pull-through. It starts with the arms extended and goes through the release, feather, hands down and away, and back to the arms extended. This is done at about a 10 to 12 degree lay-back position just as you would be in at the end of the stroke. Next is the SWING/ RELEASE or “Swing Pick” drill which incorporates the upper body swing that both proceeds and follows the release. the HALF SLIDE drill follows incorporating the legs using just half slide. The last drill is the CATCH or “Punching” drill, in which an effort has to be made to restrain the back from swinging, and the arms from bending. This drill always feels somewhat awkward because the upper-body will naturally try to swing, due to it’s own momentum, and must be restrained to avoid completing a full stroke. It is very useful, however, for showing how powerful and important the legs are at the catch. It demonstrates the importance of keeping the arms straight and maintaining the upper body position during the first part of the stroke. All four drills should be practices as a warm-up exercise each time that you go out.
1. The Release Drill, or “Pick Drill”
Start by sitting all the way back on the slide in a laid back position with the back inclined about 10 to 12 degrees from vertical. The legs and arms are straight out so that the oars are perpendicular to the boat, wrists are flat, and the thumbs are over the end of the handle exerting slight outward pressure on the oarlock.
With the blade in the water perpendicular to the boat, pull the oar up toward the lower part of the rib cage (not down toward your hips). At the end of the stroke push the hands down, feather the blade with the wrists at about 45 degrees to the forearm, and push the hands away until the oars are again perpendicular to the boat. Practice this part of the stroke until you can get both hands out together. The hands will clear while pulling and pushing. A word about the wrist position and grip: A crooked or bend wrist while pulling will soon tire and become tight. The grip on the oar should be relaxed, and must be sensitive enough to feel the effect of the water on the blade.
2. The Swing/Release Drill, or “Swing Pick”
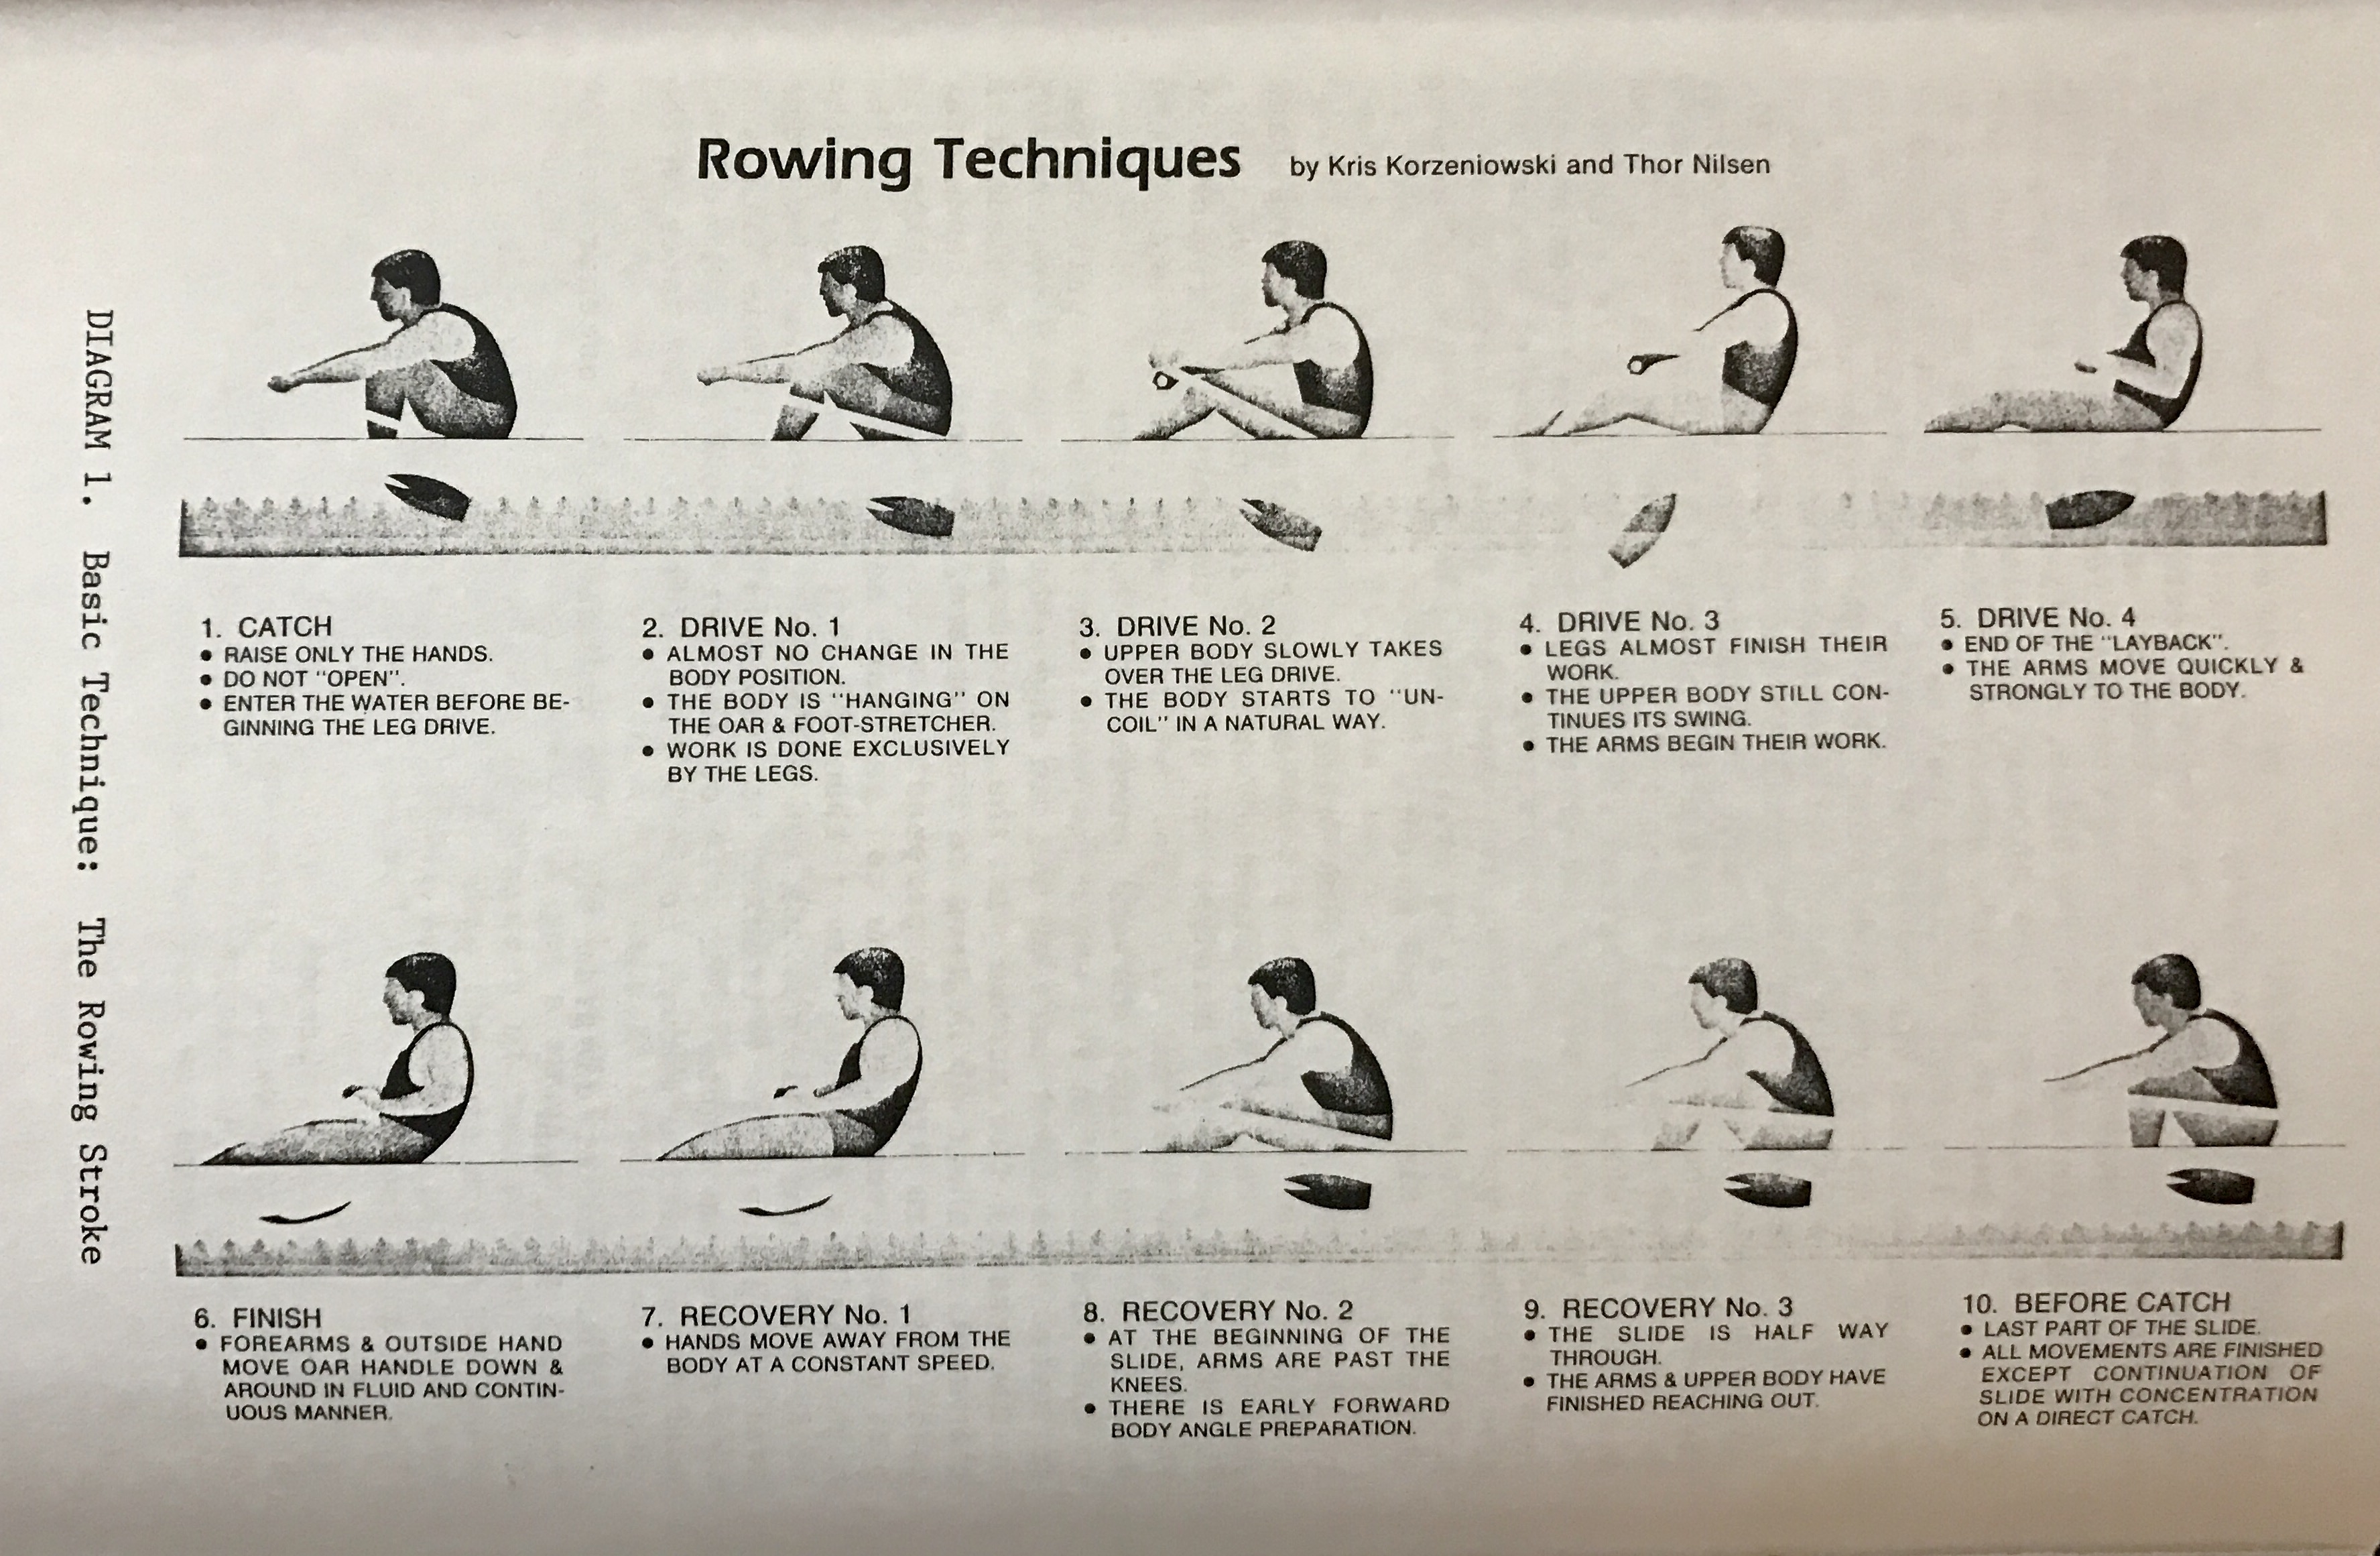
This drill is an extension of the release drill and incorporates the swing of the back from the hips just before the arms are drawn to the rib cage. Again start with legs and arms fully extended, but swing froward from the hips so that the oar forms an angle of less than 90 degrees with the boat. The first motion of the pull-through will be teh back swinging through the vertical position to about a 10 to 12 degree lay-back. As in the release drill this is followed by straightening, but now we follow with the back swinging through vertical. It is important to swing the upper torso from the hips and blend the last part of the body swing through vertical with the start of the arm contraction for a smooth, but quick finish. Again, referring to diagram #1; The Swing/Release Drill concentrates on positions 3 through 8 without using the legs.
3. The Half Slide Drill, or “Half Slide”
The half slide drill is exactly as it sounds; You start approximately half as far up the slide as you would when taking a full stroke. The upper body is in the same full-forward position as at the beginning of the Swing/Release Drill. The upper body is “Hanging On”, with the arms fully extended. As the leg drive finishes the upper body takes over and the body starts to “uncoil” in a natural way. We are simply adding on the last part of the leg drive to the Swing/Release Drill. It is important that the end of the leg drive and the beginning of the upper body swing “blend” together smoothly. On the recovery, first the arms move away from the body, followed by the upper body forward swing, all at a constant, controlled speed until the hands are past the knees. The emphasis on the drive is a smooth blending of the legs, back, and arms. The emphasis on the recovery is on first getting the forward body position half way up the slide using the legs. Referencing Diagram #1: The Half Slide Drill concentrates on positions 2 through 9.
4. The Catch Drill, or “Punching Drill”
The “Punching Drill” demonstrates the efficiency of “punching” the catch with the legs while the back and arms form a link to “hang on” and transmit the force of the leg drive to the oar blade. Since the body is in the full forward position, all that remains is to raise the hands to anchor the bale in the water and then apply the leg drive. The difficult part of this drill is maintaining this position at the end of about 1/2 to 3/4 slide leg drive. The momentum of the upper body will try to swing the body toward vertical, and there is a tendency to break the arms. This has to be resisted by keeping the arms straight and tensing the abdominal muscles so that the hands stay forward of the knees. The face that the upper body will try to swing toward the bow due to it’s own momentum , or “uncoil” in a natural way is instructive and indicates that the upper body will swing pretty much on it’s own. This is another way of showing how your body weight is used to it’s own advantage and “hangs on” to the oar. Referencing Diagram #1: The catch Drill concentrates on postions 1, to 2 1/2 of the drive, and about 8,9, and 10 of the recovery.
Leave a Reply